How to Improve Your Pistol Shooting Skills

Grip: How to Hold a Pistol

Getting a good grip on your pistol is key to becoming a better pistol shooter as a proper grip helps with recoil, keeps your aim steady, and improves your overall shooting. Here’s how to get a proper grip:

  • Start in the Holster: Get a solid grip on your pistol while it’s in the holster. This helps avoid fumbling when you draw.
  • Dominant Hand Placement: Place the gun in the web of your dominant hand, between your thumb and index finger. Make sure your hand is as high on the backstrap (the top part of the grip) as possible.
  • Finger Off the Trigger: Keep your trigger finger straight and off the trigger until you’re ready to shoot. This is one of the 4 cardinal gun safety rules.
  • Support Hand Placement: When you draw the pistol, bring it up to meet your support hand. Your support hand should be angled at about 45 degrees with your thumb pointing at the target. Position your shooting thumb on top of your support thumb, both pointing forward. This “thumbs forward” grip gives you a stable shooting platform.
  • Incorrect support hand placement: Avoid the “cup and saucer” method where your support hand is under the grip. Stick to the “thumbs forward” grip for better control and accuracy.
  • Isometric Tension: Apply equal pressure with both hands—your dominant hand pushes forward slightly, while your support hand pulls back. This tension helps stabilize the handgun during recoil.
how-to-hold-a-pistol-grip

The thumbs-forward grip.

wrong-pistol-shooting-grip-hand-positioning

Incorrect handgun grip methods.

Proper Trigger Finger Placement

Getting your trigger finger placement right is key to shooting accurately. Here’s how to do it:

  • Avoid Common Mistakes: Don’t use the first crease or the very tip of your finger to press the trigger. This can cause you to pull shots to the side—to the left for right-handed shooters—and messes with your control.
  • Use the Pad: Most shooters find the best results when using the pad of their finger (the area between the tip and the first joint). This spot gives you the right amount of control and helps keep your shots on target.
  • Find What Works for You: Everyone’s hands are different. If the pad method doesn’t feel right, try experimenting with different parts of your finger until you find what’s most comfortable and effective.
trigger-finger-placement-mistakes
trigger-contact

Trigger Control

Trigger control involves applying smooth, consistent pressure to the trigger until the shot is fired. The goal is to pull the trigger without disturbing the aim of the pistol. Beginners often make the mistake of jerking or slapping the trigger, which can cause the shot to go off target.=

Tips for a smooth and consistent trigger pull

  • Proper Finger Placement: Place the pad of your index finger.
  • Steady Pressure: Apply pressure to the trigger slowly and steadily. Think of it as a gentle squeeze rather than a quick pull. You want the trigger to break (fire) the shot without anticipating it.
  • Breathing: Manage your breathing to help steady your aim. Take a deep breath, exhale halfway, and then hold your breath while you squeeze the trigger. This helps minimize movement.

Dry-fire practice is an excellent way to practice trigger control without using live ammunition. As soon as you’re able to press the trigger smoothly and consistently, move on to live-fire practice.

Handgun Shooting Classes

GRITR Range offers a variety of handgun training courses for beginners and experienced shooters.

Shooting Stance

The three most common pistol shooting stances are the Isosceles, Weaver, and Chapman. Each has its pros and cons, but generally, it doesn’t matter which one to use as long as it works for you.

Weaver Stance

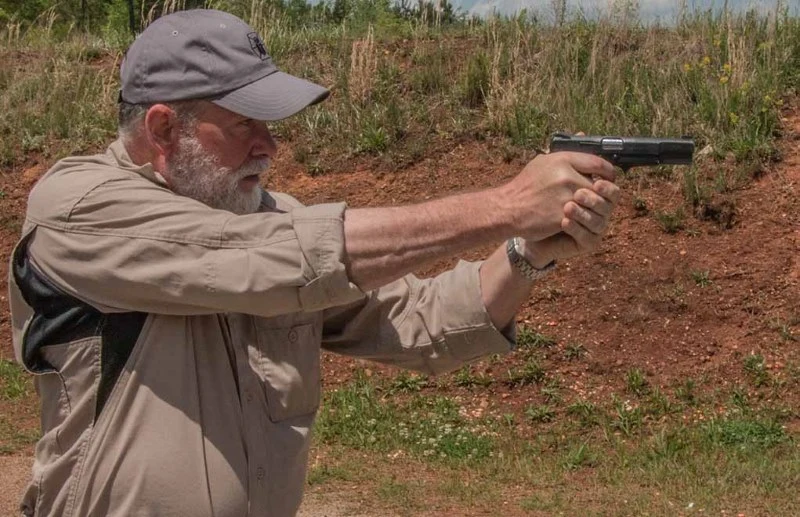
Named after Jack Weaver, this stance helps control recoil, especially during rapid fire. Here’s how to do it:

weaver-stance-for-shooting-handgun (1)

  • Feet: Stand with your feet about shoulder-width apart. Place your support foot slightly forward, usually at a 45-degree angle, while your dominant foot stays behind. Slightly bend your knees to lower your center of gravity.
  • Arms: Your dominant arm (shooting arm) should be slightly bent, while the support arm is more bent, creating a stable, triangular structure

weaver-stance

Pros: The staggered feet give you a stable base, and the push-pull technique helps manage recoil. You also present a smaller target to an opponent.

Cons: It can be hard to rotate to your non-dominant side, and cross-dominant shooters might struggle with sight alignment. If you’re wearing body armor, it might expose your vulnerable side.

Chapman Stance

Also called the Modified Weaver, this stance was developed by Ray Chapman. It tweaks the Weaver stance for better aim:

chapman-stance

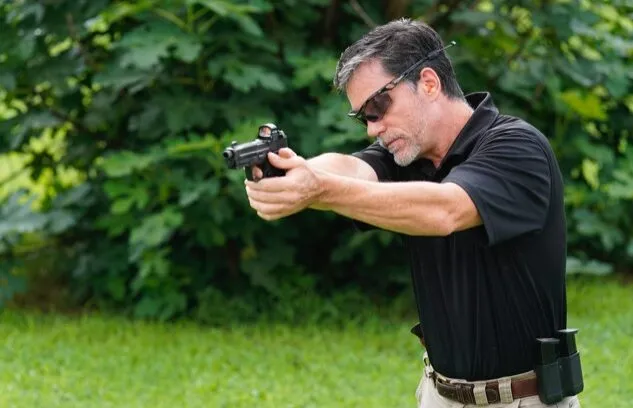
  • Feet: Begin with the same foot positioning as the Weaver stance.
  • Arms: The key difference here is that your dominant arm is fully extended, making it easier for many shooters to achieve a consistent aim. It also creates a cheek-weld.
  • Head: Tilt your head slightly to align with the sights more comfortably.

Pros: Extending the dominant arm helps with consistent aiming and better recoil control. It’s great for cross-dominant shooters because it aligns the opposite eye with the sights.

Cons: Rotating to the non-dominant side can still be difficult, and the cheek-weld position might strain your neck over time.

Isosceles Stance

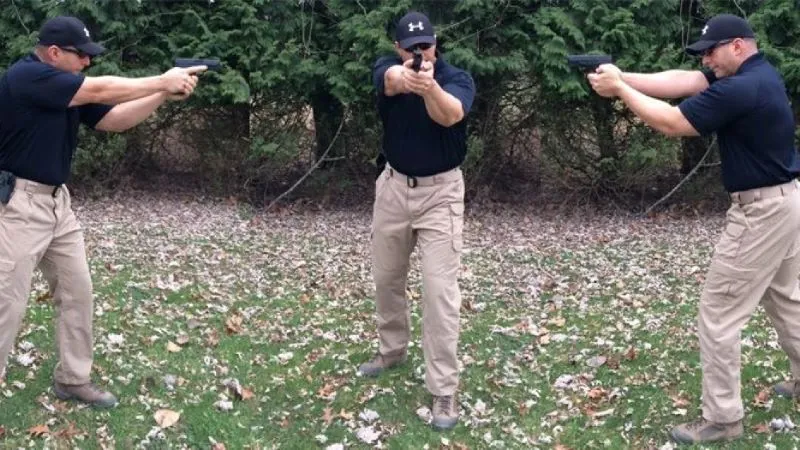
Named after the triangle shape formed by your arms, the Isosceles stance is easy to learn and offers great balance.

isoceles-stance

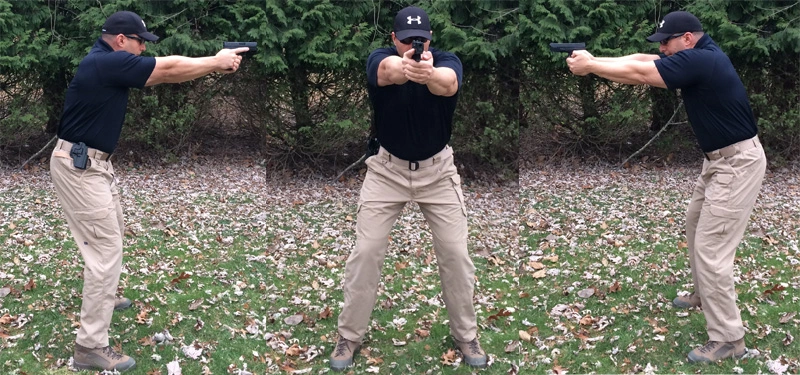
  • Feet: Stand with your feet shoulder-width apart and even with each other. Keep both knees slightly bent to maintain flexibility and absorb recoil.
  • Arms: Extend your arms straight out in front of you, forming an isosceles triangle with your shoulders. Both arms should be locked and straight.
  • Body: Keep your torso facing squarely towards the target with your weight slightly forward. Leaning forward from your hips will aid in managing recoil.

Pros: Simple and stable, providing solid stability. It allows for efficient target transitions and quick follow-up shots while staying square to the target gives you a broader field of view.

Cons: It might feel less stable if pushed from the front or rear. Also, the stance exposes more of your body to the target.

How to Aim a Hangun: Sight Alignment & Sight Picture

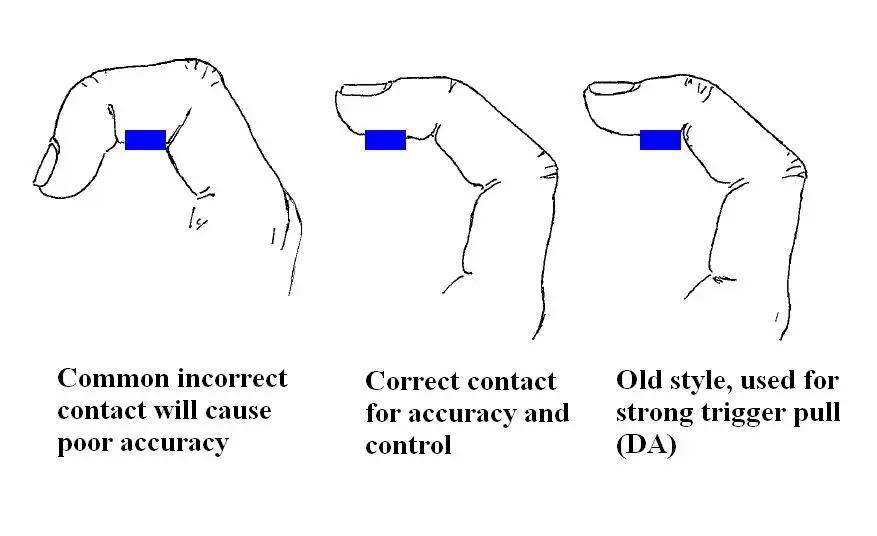
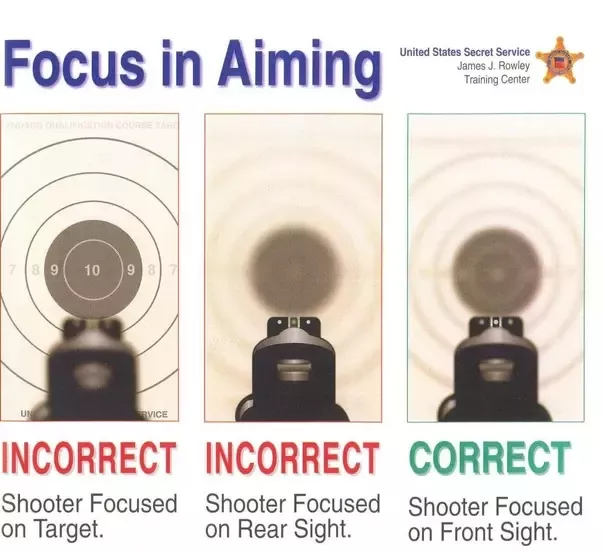
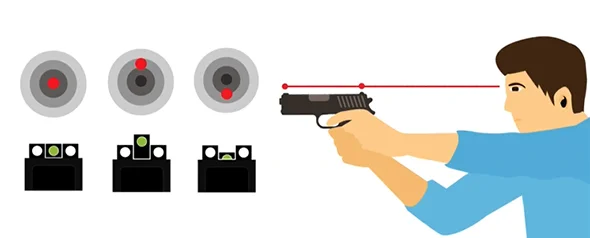
Sight alignment means lining up your eye, the rear sight, and the front sight in a straight line. The sight picture is what you see when your sights are aligned with the target. When it comes to improving your shooting accuracy, you want to keep your focus sharp on the front sight and let the target appear slightly blurry.

front-sight-focus

how-to-use-iron-sights

Here’s how to improve your sight picture:

  • Dry-Fire Practice: Without any live ammunition, practice aligning your sights and maintaining a sight picture. This helps develop muscle memory without the distraction of recoil.
  • Wall Drill: Stand a few feet away from a blank wall, and practice bringing your pistol up to your line of sight. Focus on aligning the sights perfectly each time.
  • Shooting with a Timer: Use a shooting timer to practice quickly aligning your sights and getting a good sight picture under time pressure. Start slow and gradually increase speed as you improve.
  • Dot Torture Drill: This drill involves shooting at small dots on a target, requiring precise sight alignment and trigger control.

Importance of Follow-Through

Follow-through is what you do after the bullet leaves the barrel. Keep your aim steady and your finger on the trigger even after the shot. Recoil will cause some movement, but try to quickly bring the sights back on target. Reassess your sight alignment and picture before taking the next shot.

Breathing Techniques

Breathing might not seem like a big deal, but it can actually make a huge difference in your shooting accuracy. When you breathe, your chest rises and falls, which can cause your sights to move slightly. So proper breathing can help you maintain a steady aim.

  • Natural Respiratory Pause: Take a few normal breaths. On your third breath, pause naturally before exhaling. This short pause—just a couple of seconds—is when your body is the most still, perfect for taking a shot.

natural-respiratory-pause-shooting

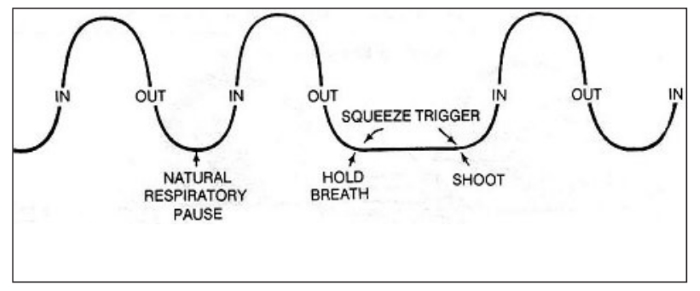
  • Half-Breath Hold: Take a deep breath, let out about half of it, and hold your breath while you take the shot. This minimizes chest movement and helps steady your aim.
  • Breathe with your stomach: Breathing with your chest causes your rib cage to expand, which can move your shoulders and arms. So instead, focus on moving your diaphragm towards your stomach to keep your upper body steady.

How to Control Recoil

One common mistake that beginner shooters often make is anticipating the recoil. This usually involves flinching or pushing the gun down in anticipation of the shot, which can significantly throw off your aim. Here are some tips to help you avoid this:

  • Understand What Recoil Feels Like: First, it’s essential to get comfortable with what recoil actually feels like. Spend some time at the range simply firing your weapon and observing how it moves. Understanding that recoil is a natural part of shooting can help you get used to it and stop feeling anxious about the movement.
  • Keep a Loose Grip: A death grip on your pistol can make you more prone to flinching. Instead, hold the gun firmly but not too tight. Think of it as a firm handshake. This will help you manage the recoil better and stay relaxed.
  • Focus on the Process: Concentrate on your breathing, sight alignment, and trigger pull instead of thinking about the recoil. The more you focus on executing these steps correctly, the less you’ll worry about the gun’s kickback. Remember, the shot should surprise you a little each time.
  • Ball and Dummy Drill: One highly effective technique to overcome anticipation is the “ball and dummy” drill. Here’s how it works: purchase some snap caps (dummy rounds that mimic the weight and shape of real ammunition) and load your magazine with a mix of live ammo and these dummy rounds. As you shoot, if you anticipate a shot on a dummy round, you’ll see the front sight dip. This visual feedback is crucial. When this happens, unload your gun and perform five perfect trigger pulls in dry-fire mode. Repeat this drill until you no longer anticipate the shot.

Improving your pistol shooting skills is a journey that requires patience, practice, and dedication. Start with the basics: ensure your stance, grip, and trigger control are consistently correct. Practice dry-firing with an unloaded gun, focusing on maintaining a steady sight picture as you squeeze the trigger. Train yourself not to blink when the gun fires, and focus on tracking that front sight as the gun recoils. The more you practice, the better your muscle memory will become, and your brain will naturally learn to get those sights back on target. If you can achieve 2-inch groups at 7 yards, you’re ready to move on.

FAQs

To hold a handgun for maximum accuracy, use both hands in a firm yet not overly tight grip. Position your dominant hand high on the grip so that your thumb is aligned with the slide. Use your non-dominant hand to wrap around the front of the grip, with fingers tight against your dominant hand. Ensure your thumbs are pointed forward and stacked, one over the other, to maintain a solid, stable base.

When holding and firing a handgun, extend your arms out fully in front of you, ensuring they are not locked but slightly bent. Your hands should be at a comfortable distance, approximately 18-24 inches from your face, allowing you to align your sights while maintaining control. This stance helps balance your body and manage recoil more effectively.

The proper handgun grip involves both hands working together to stabilize the firearm. Your dominant hand should grasp the grip as high as possible, with the thumb pointing forward. Place the support hand’s palm over the exposed portion of the grip, and wrap your fingers around the gun. Stack your thumbs along the frame, parallel to the slide. This grip helps reduce recoil and increases control.

When firing a pistol, ensure that your trigger finger contacts the trigger with the pad, not the joint. Pull the trigger in a smooth, steady motion straight back towards you. Your goal is to apply consistent pressure to avoid jerking the gun, which can disrupt your aim. Focus on squeezing the trigger rather than pulling it quickly.

Trigger discipline means keeping your finger off the trigger until you are ready to shoot. This safety practice prevents accidental discharges and ensures you only fire when you have positively identified your target. Keep your finger indexed along the frame outside the trigger guard until your sights are on target and you’re prepared to shoot.

Recoil is when a gun kicks back upon fire. To control recoil, maintain a firm grip and a stable stance. Lean slightly forward into the shot with your weight distributed evenly on both feet. Keep your wrists strong and elbows slightly bent to absorb the recoil motion. Focus on the front sight and work on tracking it through the recoil cycle. With consistent practice, your muscles will learn to counteract the recoil and return the sights back on target efficiently. Doubling up on ear protection when during range practice can also help reduce the instinct to flinch, aiding in better recoil management.

Leave a comment